


Last updated on July 17th, 2024 at 08:59 pm
Build a REST API with NodeJS, Express & MongoDB using a NodeJS driver mys
In this tutorial we are building a REST API with NodeJS, Express, and MongoDB. This API will be used to manage notes created by our users in a simple note-taking app. We will be able to create, retrieve, update, and delete notes using this API.
Prerequisites
- Basic knowledge of JavaScript
- Node.js and npm installed on your machine
- MongoDB atlas account (we will be using MongoDB Atlas, a cloud-hosted MongoDB service). Create one if you don’t have it already.(https://www.mongodb.com/cloud/atlas)
- Postman, a popular API client, to test the API endpoints
- A code editor like Visual Studio Code
- A terminal or command prompt
Getting familiar with techStack and keywords:
- Node.js: A JavaScript runtime built on Chrome’s V8 JavaScript engine. Its is just the same old JavaScript but now you can run it on your machine outside the browser.In our case we are using it to build a server that will handle our API requests.
- Express: A minimal and flexible Node.js web application framework that provides a robust set of features for web and mobile applications. We will use Express to build our REST API.
- MongoDB: A document-based NoSQL database. We will use MongoDB to store our notes data. We are using MongoDB Atlas which is a cloud-based database service.
- REST API: REST stands for Representational State Transfer. It is an architectural style for designing networked applications. A RESTful API is an application program interface (API) that uses HTTP requests to GET, PUT, POST and DELETE data. We will build a REST API to manage our notes data.
- CRUD operations: CRUD stands for Create, Read, Update, and Delete. These are the basic operations that can be performed on data. We will implement these operations in our API.
- Postman: A popular API testing tool that allows you to test your APIs by sending HTTP requests and inspecting the responses. We will use Postman to test our API endpoints.
Setting up the project:
- Create a new directory for your project and navigate into it.
- Run
npm initto create a new Node.js project. - Install the required dependencies:
express: A web application framework for Node.jsmongodb: The official MongoDB driver for Node.jsdotenv: A zero-dependency module that loads environment variables from a .env file into process.env. This helps us to securely store our database connection infonodemon(optional): A utility that will monitor for any changes in your source and automatically restart your server. This is useful during development. It automatically restarts the server when you make changes to your code and hence saves you the time of manually restarting the server.cors(optional): A package that allows you to enable CORS with various options. This is needed if you want to make requests to your API from a different domain. We will need this when our react/nextjs frontend hosted on different domain makes requests to our API.
- Create a .env file in the root of your project and add the following environment variables as such:
    MONGODB_URI=mongodb+srv://<UID>:<YOURPASSWORD>@cluster0.q1bstfy.mongodb.net
DB_NAME=notesDB- Create an entryway file for your application(server.js) in the root of your project and set up your server.
Setting up the server:
- In server.js, we will first import the required dependecies.
- Next, we will set up the Express app.
- We will then define an initial/default route for testing. This route will return a message on the browswer when the server is running.
- Finally we define a PORT variable and listen for requests on that port. We will log a message to the console when the server is running.
- We can now start the server by running `nodemon server.js` in the terminal.(note: you can opt for `node server.js` but you will have to manually restart the server everytime you make changes to your code)
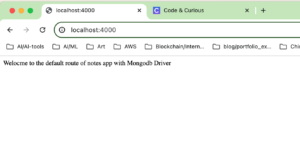
Now if we go to your browser and navigate to http://localhost:3000, you should see the message “Welcome to the default route of notes app with mongodb” displayed on the screen.
//server.js
const express = require('express');
const app = express();

app.get('/', (req, res) => {
res.send('Welcome to notes App, this is the basic initial route');
});

const port = 4000;

app.listen(port, () => {
console.log(Server is running on port ${port}. http://localhost:${port});
});
We have now successfully built a basic app with a route defined that returns just a message. Now lets structure of our project and start building our API.
Project Structure:
- We will structure our project in a way that follows best practices and is easy to maintain. We will use the MVC(Model-View-Controller) architecture.
- Create a src directory in the root of your project. Then create the following directories inside the src directory. The Project Structure should look like this
  src/
  ├── config/
  │   └── db.config.js
  ├── controllers/
  │   └── notes.controller.js
  ├── models/
  │   └── notes.model.js
  ├── routes/
  │   └── notes.routes.js
  ├── server.js
  └── .env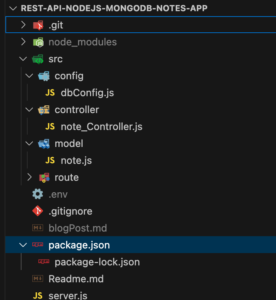
Setting up the database:
- In the config directory, create a dbConfig.js file.
- In dbConfig.js, we will import the required dependencies and set up the database connection.
- We are using mongodb driver for nodejs to connect to our MongoDB database, so will use the MongoClient class to connect to the database.
- We will create a connectDB function that will connect to the database and return the database object.
- We will export the connect function so that we can use it in other parts of our application.
- To test out the successful connection to the database, we will log a message to the console when the connection is established.
//config/dbConfig.js

require('dotenv').config();
const { MongoClient } = require('mongodb');

const uri = process.env.MONGODB_URI
const dbName = process.env.DB_NAME

const client = new MongoClient(uri);
let connection;

const connectDB = async () => {
    if (connection) {
        return connection.db(dbName);
    }
    try {
        connection = await client.connect();
        console.log("successfully connected to MongoDB")
    } catch (error) {
        console.log("Error connecting to MongoDB:", error)
        throw error;

    }
    return connection.db(dbName);
}

module.exports = { connectDB };
note: to test the connection , import the connectDB function in the server.js by requiring it and calling it in the server.js file.
  const db = require('./src/config/db.config');
    db.connecDB();
Now when you save your file and the server starts you should see a message successfully connected to MongoDB.
Creating the note model:
- In the models directory, create a note.js file.
- In notel.js, we will define the schema for our notes data.
- We will make this Note model into a class with a constructor that takes in following parameters:
- title: The title of the note (string)
- description: The description of the note (string)
- isLiked: A boolean value indicating whether the note is liked or not (boolean)
- difficulty: The difficulty level of the note (integer)
- createdAt: The date and time when the note was created (date)
- We will also define static methods inside this class for performing CRUD operations on the notes data.
- We will be creating following static methods:
- insertNote: Create a new note
- getAllNotes: Retrieve all notes
- getNoteById: Retrieve a single note by ID
- updateNote: Update a note by ID
- deleteNote: Delete a note by ID
- deleteAllNotes: Delete all notes
- We need to perform CRUD operations in our collection named `notes` in the database. To do this we need to get the referrence to our collection using the connection we have established with our database. We can access our connection by importing the connectDB function from the db.config.js file.
- Also another important concept we can not miss here is the asynchronous nature of transaction. Since we are dealing with database operations which are asynchronous in nature, we will be using async/await to handle the promises returned by the database operations.
- We refer to Mongodb documentation to see how to perform CRUD operations using the mongodb driver for nodejs. We will be using the `insertOne`, `find`, `findOne`, `updateOne`, `deleteOne`, `deleteMany` methods to perform the CRUD operations.
Creating Note controllers:
- Create a new directory named
routesin the root directory of the project. This folder will contain the route files for our REST API. - Inside the
routesfolder, create a new file namednotes.js. This file will contain the route definitions for managing notes in our note-taking app. - In the
notes.jsfile, we need to import the Express module and theconnectMongoDB()function from theconnection.jsfile. - We will also create a new Express router instance and define the route handlers for creating, retrieving, updating, and deleting notes.
- We will use the Express router to define the routes for our API endpoints. We will create routes for the following CRUD operations:
- POST /notes – Create a new note
- GET /notes – Retrieve all notes
- GET /notes/:id – Retrieve a single note by ID
- PUT /notes/:id – Update a note by ID
- DELETE /notes/:id – Delete a note by ID
- DELETER /notes – Delete all notes
- We will use the
connectMongoDB()function to establish a connection to the MongoDB database and use the database object to perform CRUD operations on the notes collection. - We will export the router so that we can use it in the
server.jsfile.
//src/controllers/notes.js

const Note = require('../model/note')

exports.createNote = async (req, res) => {
    const date = new Date();
    const createdAtStamp = date.toLocaleString();
    try {
        let newNote = {
            title: req.body.title,
            description: req.body.description,
            is_liked: false,
            difficulty: 1,
            created_at: date
        };
        let result = await Note.insertNote(newNote);
        res.status(200).json(result)


    } catch (error) {
        res.status(500).send({
            message: error.message || "Some error occurred while creating the Note."
        });

    }

}

exports.getAllNotes = async (req, res) => {
    try {
        const result = await Note.getAllNotes();
        res.status(200).send(result);

    } catch (error) {
        res.status(500).send({
            message: error.message || "Some error occurred while retrieving notes."
        });

    }

}

exports.getNoteById = async (req, res) => {
    try {
        const id = req.params.id;
        const result = await Note.getNoteById(req.params.id);
        res.status(200).send(result);

    } catch (error) {
        res.status(500).send({
            message: error.message || "Some error occurred while retrieving note."
        });

    }

}

exports.updateNote = async (req, res) => {
    const date = new Date();
    const createdAtStamp = date.toLocaleString();
    try {
        const id = req.params.id;
        const { title, description, is_liked, difficulty } = req.body;

        const updatedNote = {
            title,
            description,
            is_liked,
            difficulty,
            created_at: createdAtStamp
        }
        const result = await Note.updateNote(id, updatedNote);
        res.status(200).send(result);

    } catch (error) {
        res.status(500).send({
            message: error.message || "Some error occurred while updating note."
        });

    }

}

exports.deleteNote = async (req, res) => {
    try {
        const id = req.params.id;
        const result = await Note.deleteNote(id);
        res.status(200).send(result);

    } catch (error) {
        res.status(500).send({
            message: error.message || "Some error occurred while deleting note."
        });

    }

}

exports.deleteAllNotes = async (req, res) => {
    try {
        const result = await Note.deleteAllNotes();
        res.status(200).send(result);

    } catch (error) {
        res.status(500).send({
            message: error.message || "Some error occurred while deleting all notes."
        });

    }

}
Creating the note routes:
- In the routes directory, create a notes.js file.
- In notes.js, we will import the express module and the notesController.
- We will import the express Router and create a new router object.
- We will define the route handlers for the following endpoints:
- POST /notes: Create a new note
- GET /notes: Retrieve all notes
- GET /notes/:id: Retrieve a single note by ID
- PUT /notes/:id: Update a note by ID
- DELETE /notes/:id: Delete a note by ID
- DELETE /notes: Delete all notes
- Since we have already defined our model and controller functions, we can simply call the controller functions in the route handlers.
- We will use the express Router object to define the routes and their corresponding route handlers.
- Finally, we will export the router object so that we can use it in our server.js file.
//src/routes/notes.js
const express = require('express');
const app = express();

const router = express.Router();

const noteController = require('../controller/noteController');

router.post('/', noteController.createNote);
router.get('/', noteController.getAllNotes);
router.get('/:id', noteController.getNoteById);
router.put('/:id', noteController.updateNote);
router.delete('/:id', noteController.deleteNote);
router.delete('/', noteController.deleteAllNotes);

module.exports = router;
Now that we have everything set up, we can test the API endpoints using Postman.
Testing the API Endpoints using Postman
Open Postman and create a new request.
Testing the Create Note Endpoint(Post request)
- Set the request type to POST and enter the URL
http://localhost:4000/api/notes. - In the request body, select the raw option and set the body type to JSON.
- Enter the note data in JSON format. For example:
{
    "title": "Note 1",
    "description": "This is the first note"

}
-note: we are not passing the isLiked, difficulty and createdAtStamp fields as they are predefined in the route handler when creating new document.
- Click on the Send button to create a new note. You should receive a JSON response with the newly created note data.
Testing the Retrieve All Notes Endpoint(Get request)
- Set the request type to GET and enter the URL
http://localhost:4000/api/notes. - Click on the Send button to retrieve all notes. You should receive a JSON response with an array of notes.
- If there are no notes in the database, the response will be an empty array.
- If there is an error while retrieving the notes, you will receive an error message.
Testing the Retrieve Single Note by ID Endpoint(Get request)
- Set the request type to GET and enter the URL
http://localhost:4000/api/notes/:id, where:idis the ID of the note you want to retrieve.( You can retreive this id from the response of Retreive all notes ) - here is the example of what the URL should look like
http://localhost:3001/notes/6675fd21e5096b013fca63b7 - You should receive a JSON response with the note data for that specific note (if it exists).
Testing the Update Note by ID Endpoint(Patch request)
- Set the request type to PATCH and enter the URL
http://localhost:4000/api/notes/:id, where:idis the ID of the note you want to update. - In the request body, select the raw option and set the body type to JSON.
- Enter the updated note data in JSON format. For example:
{
    "title": "Updated Note 1",
    "description": "This is the updated note",
    "isLiked": true,
    "difficulty": 2
}
(note: Here we do not need to pass the createdAtStamp field as it is predefined in the route handler when updating the document)
- Click on the Send button to update the note. You should receive a JSON response with the updated note data.
Testing the Delete Note by ID Endpoint(Delete request)
- Set the request type to DELETE and enter the URL
http://localhost:4000/api/notes/:id, where:idis the ID of the note you want to delete. - Click on the Send button to delete the note. You should receive a JSON response with the result of the delete operation.
- If the note is successfully deleted, the response will contain information about the deleted note.
- If there is an error while deleting the note, you will receive an error message.
Similarly you can delete all your data by selecting DELETE method in the dropdown and providing the api endpoint http://localhost:4000/api/notes/. You Have now successfully destroyed all your hard work. No worries tough you can now easily add or update notes with the API you just built.
Bravo! Give yourself a pat on your back and smile now. Your hard work as paid off.
Conclusion:
In this tutorial, we have built a REST API with Node.js, Express, and MongoDB. We have learned how to structure our project using the MVC architecture, define routes, controllers, and models, and perform CRUD operations on a MongoDB database. We have also learned how to use Postman to test our API endpoints. By the end of this tutorial, you should have a good understanding of how to build a simple REST API with Node.js, Express, and MongoDB. You can now use this knowledge to build more complex APIs . Happy coding !
Source Code:
For full Source code ,checkout the Github repo:
Github: https://github.com/koirpraw/rest-api-nodejs-mongodb-notes-app
If you need more practice or check out how to build similar API with variations. Checkout other similar project articles: